
I’ve gone through four pairs of mountain bike shoes in the last six years, and every single time I bought the wrong one first. The first pair felt great in the shop and then went numb on my feet after 90 minutes on the trail. The second pair gripped my flat pedals like glue but turned every hike-a-bike section into a slip-and-slide nightmare. So this guide isn’t theoretical. It’s the article I wish someone had handed me before my first purchase.
If you’re standing in front of a wall of shoes — or scrolling through forty browser tabs — trying to figure out whether you need clipless or flat, what sole stiffness actually means, or why one shoe costs $80 and another costs $400, this will get you to a confident decision without the guesswork.
The Short Answer
If you just want the quick version: choose flat pedal shoes if you’re new to mountain biking, ride mostly trail/enduro/downhill, or want the ability to put a foot down instantly in technical terrain. Choose clipless shoes if you race cross-country, do long endurance rides, or want maximum pedaling efficiency and don’t mind a brief learning curve to unclip safely. Most riders should expect to spend $120–$220 for a shoe that will genuinely last two to four seasons of regular riding. Below that, you’re usually compromising on outsole rubber quality or closure durability. Above $300, you’re paying for carbon soles and marginal stiffness gains that mostly matter to racers.
That’s the headline. Now let’s get into why, because the “why” is what actually helps you pick the right shoe for your riding instead of someone else’s.
Flat Pedal vs. Clipless: The Decision That Actually Matters
Every other choice in this guide is downstream of this one, so let’s settle it first.
Flat pedal shoes
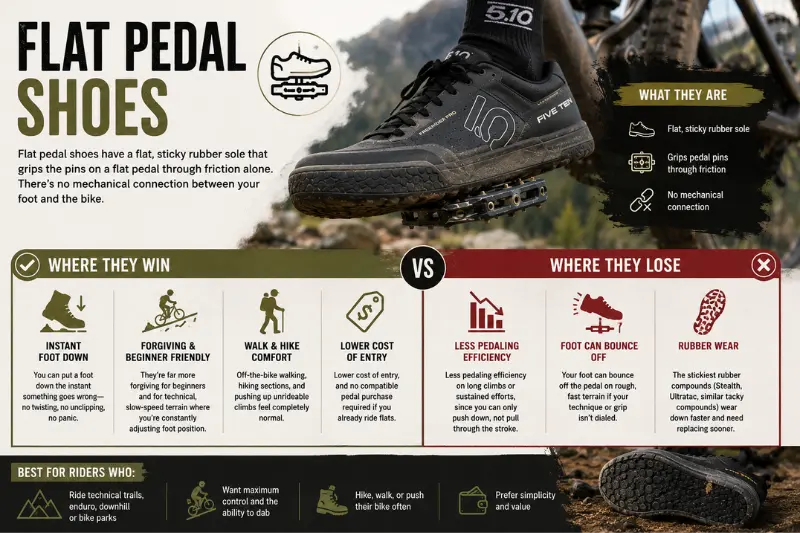
These have a flat, sticky rubber sole that grips the pins on a flat pedal through friction alone. There’s no mechanical connection between your foot and the bike.
Where they win:
- You can put a foot down the instant something goes wrong — no twisting, no unclipping, no panic
- They’re far more forgiving for beginners and for technical, slow-speed terrain where you’re constantly adjusting foot position
- Off-the-bike walking, hiking sections, and pushing up unrideable climbs feel completely normal
- Lower cost of entry, and no compatible pedal purchase required if you already ride flats
Where they lose:
- Less pedaling efficiency on long climbs or sustained efforts, since you can only push down, not pull through the stroke
- Your foot can bounce off the pedal on rough, fast terrain if your technique or grip isn’t dialed
- The stickiest rubber compounds (Stealth, Ultratac, similar tacky compounds) wear down faster and need replacing sooner
Clipless shoes
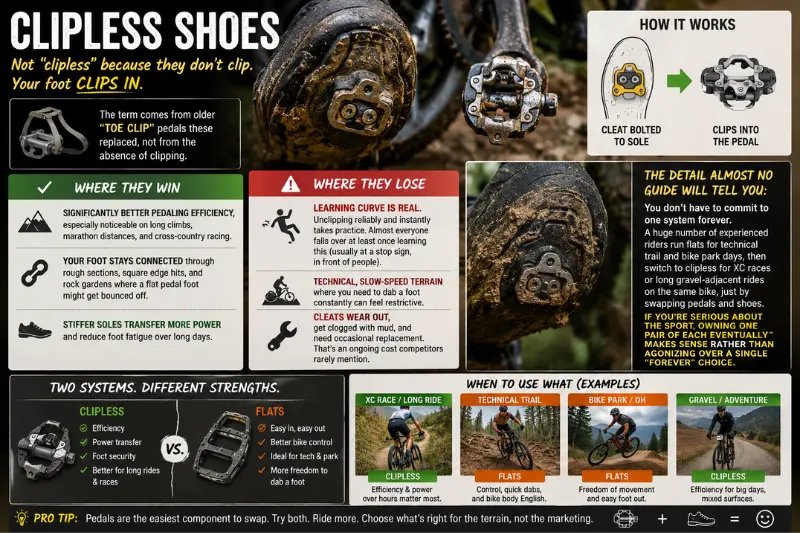
Confusingly named because your foot actually clips IN to the pedal via a cleat bolted to the sole. The term comes from the older “toe clip” pedals these replaced, not from the absence of clipping.
Where they win:
- Significantly better pedaling efficiency, especially noticeable on long climbs, marathon distances, and cross-country racing
- Your foot stays connected through rough sections, square edge hits, and rock gardens where a flat pedal foot might get bounced off
- Stiffer soles transfer more power and reduce foot fatigue over long days
Where they lose:
- There’s a real learning curve to unclipping reliably and instantly, and almost everyone falls over at least once learning this (usually at a stop sign, in front of people)
- Technical, slow-speed terrain where you need to dab a foot constantly can feel restrictive
- Cleats wear out, get clogged with mud, and need occasional replacement — that’s an ongoing cost competitors rarely mention
A detail almost no buying guide will tell you: you don’t have to commit to one system forever. A huge number of experienced riders run flats for technical trail and bike park days, then switch to clipless for XC races or long gravel-adjacent rides on the same bike, just by swapping pedals and shoes. If you’re serious about the sport, owning one pair of each eventually makes sense rather than agonizing over a single “forever” choice.
How Mountain Bike Shoes Actually Fit (The Part Most Guides Skip)
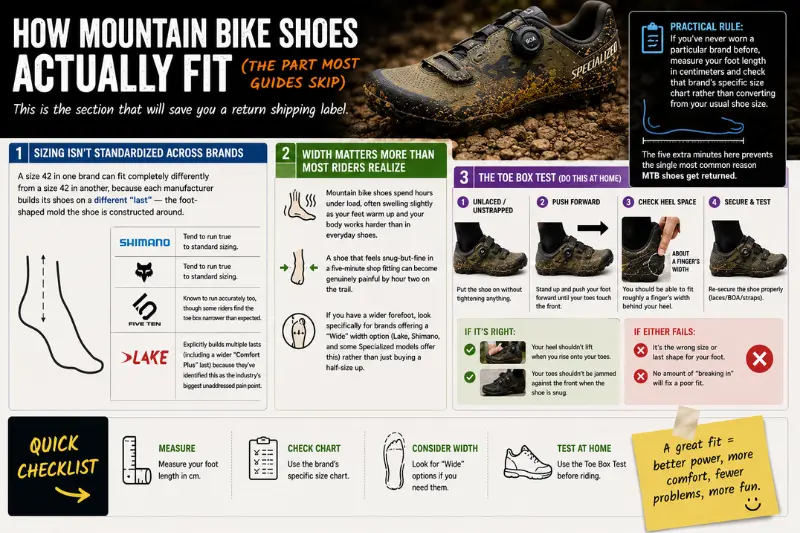
This is the section that will save you a return shipping label.
Sizing isn’t standardized across brands
A size 42 in one brand can fit completely differently from a size 42 in another, because each manufacturer builds its shoes on a different “last” — the foot-shaped mold the shoe is constructed around. Shimano and Fox tend to run true to standard sizing. Five Ten/adidas shoes are known to run accurately too, though some riders find the toe box narrower than expected. Lake explicitly builds multiple lasts (including a wider “Comfort Plus” last) specifically because they’ve identified this as the industry’s biggest unaddressed pain point — and if you have a wider foot or bunions, that’s worth knowing before you buy from a brand that only offers one shape.
Practical rule: if you’ve never worn a particular brand before, measure your foot length in centimeters and check that brand’s specific size chart rather than converting from your usual shoe size. The five extra minutes here prevents the single most common reason MTB shoes get returned.
Width matters more than most riders realize
Mountain bike shoes spend hours under load, often swelling slightly as your feet warm up and your body works harder than in everyday shoes. A shoe that feels snug-but-fine in a five-minute shop fitting can become genuinely painful by hour two on the trail. If you have a wider forefoot, look specifically for brands offering a “Wide” width option (Lake, Shimano, and some Specialized models offer this) rather than just buying a half-size up, which fixes length but does nothing for width and can create heel slip instead.
The toe box test
Here’s a simple at-home check almost nobody mentions: stand up in the shoes, unlaced/unstrapped, and push your foot forward until your toes touch the front. You should be able to fit roughly a finger’s width behind your heel. Then re-secure the shoe properly — your heel shouldn’t lift when you rise onto your toes, and your toes shouldn’t be jammed against the front when the shoe is snug. If either of those fails, it’s the wrong size or last shape for your foot, regardless of how good the brand’s marketing is.
Sole Stiffness: What It Actually Does (and Doesn’t Do)
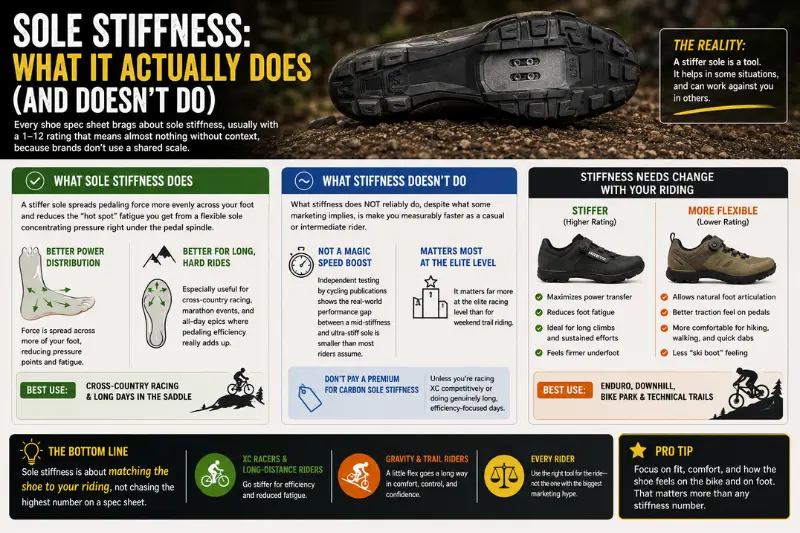
Every shoe spec sheet brags about sole stiffness, usually with a 1–12 rating that means almost nothing without context, because brands don’t use a shared scale.
Here’s the honest version: a stiffer sole spreads pedaling force more evenly across your foot and reduces the “hot spot” fatigue you get from a flexible sole concentrating pressure right under the pedal spindle. For cross-country racing and long days in the saddle, this is genuinely useful. For gravity-focused riding — enduro, downhill, bike park laps — a slightly more flexible sole actually helps, because it lets your foot articulate naturally over rough terrain and makes walking, hiking, and quick dabs feel less like wearing a ski boot.
What stiffness does NOT reliably do, despite what some marketing implies, is make you measurably faster as a casual or intermediate rider. Independent testing by cycling publications has repeatedly found the real-world performance gap between a mid-stiffness and ultra-stiff sole is smaller than most riders assume — it matters far more at the elite racing level than for weekend trail riding. Don’t pay a premium for carbon-sole stiffness unless you’re racing XC competitively or doing genuinely long, efficiency-focused days.
Closure Systems Compared
| Closure type | Best for | Tradeoffs |
|---|---|---|
| BOA dial | Riders who want quick, precise, on-the-fly adjustment | Pricier; the dial mechanism can occasionally get gritty and need cleaning; replaceable if it fails |
| Laces | Riders who want the most secure, customizable fit and don’t mind taking a moment to dial it in | Can’t loosen/tighten mid-ride easily; laces can get caught in chain or pedal hardware without a lace guard; can collect mud |
| Velcro/hook-and-loop straps | Budget-friendly, simple, durable | Loses grip over time if not kept clean; less precise micro-adjustment than BOA |
| Hybrid (BOA + strap) | Most premium shoes today | Combines benefits but adds cost and one more thing that can wear out |
BOA has become the dominant closure on anything mid-range or above for a real reason: it lets you make a one-handed adjustment without stopping, which matters when your foot swells slightly twenty minutes into a ride. But don’t dismiss a well-made laced shoe — for riders who get a perfect fit once and don’t fuss with it mid-ride, laces remain reliable, and they’re usually the cheapest closure to repair or replace if something breaks on a multi-day bikepacking trip far from a bike shop.
What Changes by Riding Discipline
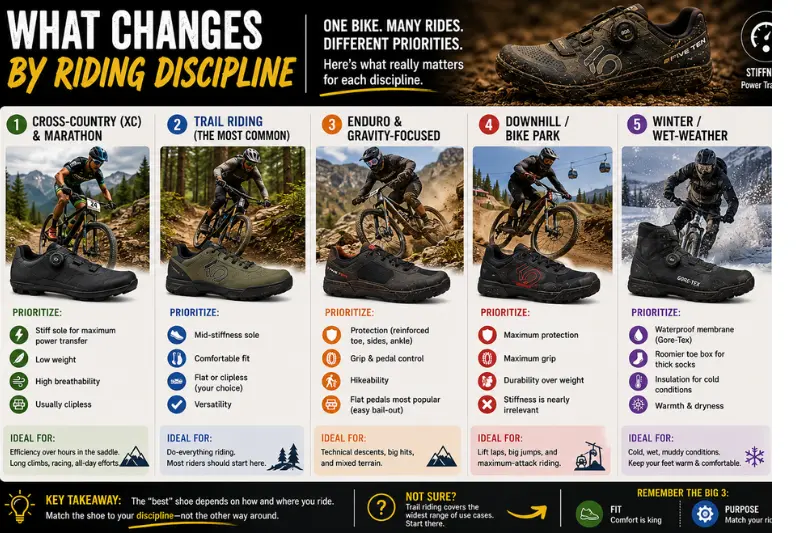
This is where a lot of generic guides get vague. Here’s the practical breakdown:
Cross-country (XC) and marathon riding: Prioritize a stiff sole, low weight, and good breathability. You’re optimizing for efficiency over hours in the saddle, often clipless. Look for shoes explicitly marketed for XC; they’ll have a more low-profile, road-shoe-adjacent shape.
Trail riding (the most common category): This is the “do everything reasonably well” category. A mid-stiffness sole, comfortable fit, and either flat or clipless depending on your preference. Most riders buying their first serious pair should start here regardless of what discipline they think they’ll specialize in.
Enduro and gravity-focused riding: Prioritize protection (reinforced toe boxes, ankle coverage) and grip over outright stiffness or weight savings. You’ll be hiking sections, taking impacts, and need a shoe that handles abuse. This is where flat pedals are most popular among experienced riders, specifically for the instant bail-out capability.
Downhill / bike park: Similar priorities to enduro but pushed further — maximum grip, maximum protection, and stiffness becomes nearly irrelevant since pedaling efficiency isn’t the goal.
Winter and wet-weather riding: This category gets almost no attention in most buying guides, which is a real gap. Look specifically for a Gore-Tex or similarly waterproof membrane, a roomier toe box that accommodates thicker socks without cutting off circulation, and an insulated liner if you ride in genuinely cold conditions. A shoe rated for warm-weather trail riding will leave your feet numb and miserable below about 40°F (4°C), regardless of how good it is in summer.
E-MTB riding: Worth a specific mention since it’s rarely addressed. E-bikes let you climb more, longer, and at higher cadence with less fatigue, which means your feet are doing more total pedal strokes per ride even though the effort feels easier. A shoe with good breathability and a slightly more cushioned footbed pays off here, since you’re likely putting in more saddle time per outing than you would on a standard bike.
Materials and Durability: What’s Actually Worth Paying For
Synthetic uppers dominate the market now, and that’s mostly good news — they’re more weather-resistant than leather, dry faster, and need less maintenance. The tradeoff is breathability, which is why ventilated mesh panels matter more on synthetic shoes than people realize, especially if you ride in warm climates.
Outsole rubber compounds matter enormously and get almost no attention in most reviews beyond “grippy” or “not grippy.” Stickier rubber compounds (often proprietary names like Stealth, Ultratac, or similar tacky formulations) genuinely outperform harder rubber on technical, rocky terrain, but they wear out measurably faster — expect to feel a grip difference after 6–12 months of regular flat-pedal riding on sticky compounds, versus 18–24 months on a harder, more durable compound. If you ride almost exclusively flat pedals on technical terrain, budget for that faster wear rate rather than being surprised by it.
A detail worth knowing before you buy: most MTB shoes are not designed to be resoled like a quality hiking boot. Once the outsole rubber wears smooth or the upper delaminates from the sole, the shoe is generally done. This makes the actual cost-per-wear calculation different from what the sticker price suggests — a $150 shoe lasting two seasons of regular riding is often better value than a $90 shoe needing replacement every season.
Cleat Position and Why It’s Worth Five Minutes (Clipless Riders Only)
This is genuinely overlooked in most consumer-facing content. Where you mount your cleat front-to-back on the sole changes how your foot interacts with the pedal stroke. A cleat positioned slightly further back (toward the heel) than the “neutral” factory position can reduce calf fatigue on long rides and is popular among endurance and gravel-adjacent riders. A more forward position is often preferred for sprint-style efforts and technical, punchy trail riding where quick power matters more than all-day comfort. Most shoes have a cleat slot with at least 10–15mm of fore-aft adjustment range — it costs nothing to experiment with, and most riders never touch the factory-default position even though it’s rarely optimal for their specific riding style.
Price Tiers: What You’re Actually Paying For
Under $120 (entry-level): Functional, durable enough for occasional or new riders. Expect a harder rubber compound (less sticky grip), Velcro or basic lace closure, and a heavier overall build. Perfectly fine for someone testing whether they’ll stick with the sport.
$120–$220 (the sweet spot for most riders): This is where you start seeing genuinely sticky rubber compounds, BOA closures becoming common, better breathability, and reinforced toe protection. For the vast majority of trail and enduro riders, this tier delivers 90% of the performance of the flagship tier at roughly half the price.
$220–$350 (performance tier): Carbon or carbon-reinforced soles, premium rubber compounds, dual BOA closures for precise two-zone fit adjustment, and noticeably lighter weight. Worth it if you’re racing, riding very long distances regularly, or simply want the best available and the cost difference doesn’t matter to you.
$350+ (flagship/specialty): Usually full carbon soles, specialized fit options (wide widths, segmented uppers for difficult foot shapes, heat-moldable components), or race-specific engineering. This tier makes sense for racers, riders with hard-to-fit feet who need the specialized last shapes, or anyone for whom marginal performance gains justify the cost.
Common Mistakes Worth Avoiding
A few patterns show up again and again in rider forums and shop return data that don’t get enough airtime in standard buying guides:
Buying based on a shop’s five-minute fit instead of accounting for foot swelling during a real ride. Walk around the shop for at least ten minutes in the shoes, not just stand at the counter.
Choosing a shoe one category too aggressive for actual riding style — buying a stiff XC race shoe for casual trail riding that involves a lot of walking and hike-a-bike, which makes off-bike comfort noticeably worse for no real performance benefit.
Ignoring sock thickness when sizing. If you typically ride in a thicker winter sock or a cushioned trail sock, try shoes on with that sock, not a thin dress sock, since the fit difference is larger than most people expect.
Underestimating cleat maintenance for clipless riders. Cleats wear down, especially if you walk around in the shoes off the bike, and a worn cleat makes clipping in and out less reliable right when you need it most.
Frequently Asked Questions
Do I need special socks for mountain bike shoes? Not strictly, but a moisture-wicking synthetic or wool-blend sock noticeably improves comfort over cotton, which holds moisture and increases blister risk on long rides. Sock thickness should match the season and shoe fit, as covered above.
Can I use regular sneakers for mountain biking? You can for very casual, low-intensity riding, but you’ll sacrifice pedal grip (on flats) or lose the ability to clip in at all (clipless), and most sneaker soles lack the stiffness to prevent foot fatigue over longer rides. They also typically lack the reinforced toe protection that matters when a pedal pin or rock makes contact.
How long do mountain bike shoes last? For regular riders (2–3 rides per week), expect roughly 2–4 years before the outsole rubber wears smooth or the upper shows real wear, depending on terrain abrasiveness and rubber compound. Heavy flat-pedal riders on sticky rubber compounds in rocky terrain are often on the shorter end of that range.
Is it normal for new MTB shoes to feel stiff at first? Yes, especially shoes with reinforced toe caps or stiffer soles. Most synthetic uppers break in within 3–5 rides. If a shoe still causes sharp pain or numbness after that, it’s the wrong fit rather than something you simply need to push through.
What’s the difference between 2-bolt and 3-bolt cleats? 2-bolt (SPD-style) cleats are the mountain bike standard, designed to be small and recessed enough to walk normally in. 3-bolt cleats are the road cycling standard, larger and not designed for walking. If a shoe is marketed for mountain biking, it will almost always use the 2-bolt system.
Should I size up or down for mountain bike shoes? Generally true to your regular shoe size is the right starting point, but always check the specific brand’s size chart first, since lasts vary significantly between manufacturers as discussed earlier in this guide. When between two sizes, sizing up is usually safer for riders who run warm or do long rides, since swelling is more forgiving in a slightly roomier shoe than in one that’s tight from the start.
The Bottom Line
The right mountain bike shoe is the one that matches your actual riding — not the one with the highest stiffness rating or the most expensive carbon sole. Start with the flat-versus-clipless decision based on your riding style and comfort level, get the fit genuinely right using the toe box and width checks above, and choose your price tier based on how often and how seriously you ride rather than what looks most impressive on a spec sheet. Get those three things right, and you’ll spend a lot less time thinking about your feet and a lot more time thinking about the trail in front of you.