
Introduction: Why Your Cycling Shoes Matter More Than You Think
Most cyclists obsess over their bike — the frame weight, the groupset, the wheels. But here’s what experienced riders know that beginners often don’t: your shoes are arguably the most critical piece of equipment you own.
Every single watt of power your legs generate has to pass through your feet before it reaches the pedals. A poorly fitted shoe doesn’t just cause discomfort — it actively bleeds away the energy you’ve worked so hard to produce. A shoe that allows your foot to move, flex sideways, or collapse inward can cost you real performance and, over long rides, real pain.
I’ve spoken to physios, bike fitters, and coaches about this, and the consensus is consistent: fix your shoes before you fix anything else. Phil Burt, a former British Cycling physiotherapist, put it best — “You can lose a hell of a lot through badly fitting shoes. If your foot is moving around or over-pronating, you can waste a lot of energy.”
This guide covers everything you need to know to choose the right pair: shoe types, sole materials, cleat systems, closure mechanisms, fit principles, wide-foot options, and the questions most articles never think to answer.
The Four Main Types of Cycling Shoes
Before you look at any specific model, you need to know which category of shoe fits your riding. Each type is designed for a fundamentally different use case.
Road Cycling Shoes
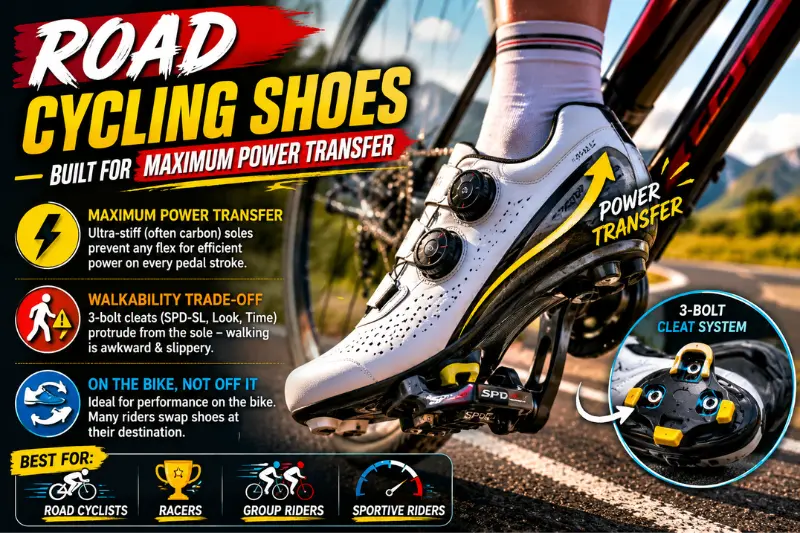
Road shoes are built around one priority: maximum power transfer. They achieve this through extremely stiff — often carbon — soles that prevent any flex as you push down on the pedal. Every joule of energy goes where you want it.
The trade-off is walkability. Road shoes use three-bolt cleats (SPD-SL, Look, or Time systems) that protrude from the sole. Walking in them is awkward and, on slippery surfaces, genuinely hazardous. They’re designed to be on the bike, not off it.
If you’re a road cyclist who goes café to café, or a commuter who needs to walk at the other end, factor this in. Many experienced road cyclists change shoes at their destination — it’s that much of a difference.
Best for: Road cyclists, racers, group riders, sportive riders.
Mountain Bike (MTB) Shoes
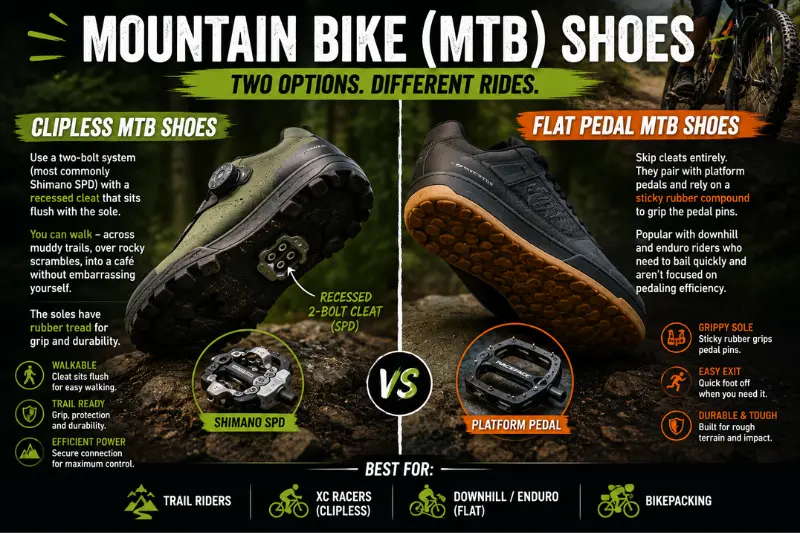
MTB shoes come in two flavors: clipless and flat.
Clipless MTB shoes use a two-bolt system (most commonly Shimano SPD) with a recessed cleat that sits flush with the sole. This means you can actually walk — across muddy trails, over rocky scrambles, into a café without embarrassing yourself. The soles have rubber tread for grip.
Flat pedal MTB shoes skip cleats entirely. They pair with platform pedals and rely on a sticky rubber compound to grip the pedal pins. These are popular with downhill and enduro riders who need to bail quickly and aren’t focused on pedaling efficiency.
Best for: Trail riders, XC racers (clipless), downhill/enduro (flat), bikepacking.
Gravel Cycling Shoes
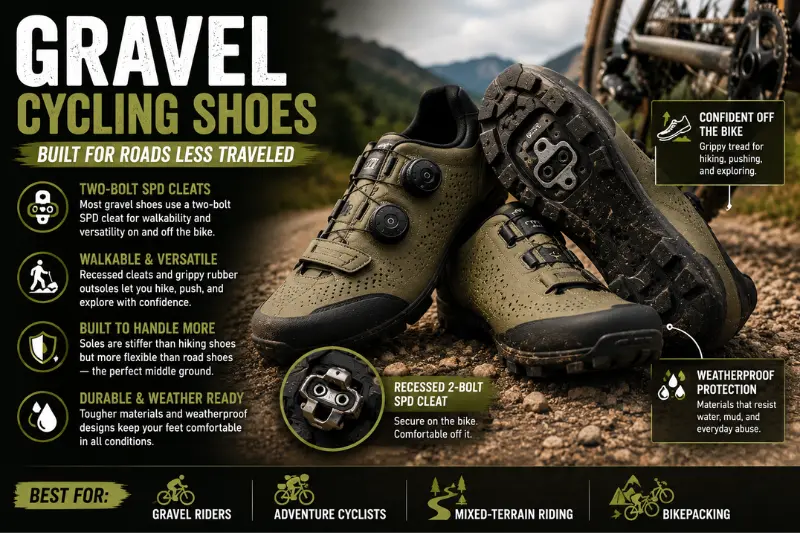
Gravel is a hybrid discipline, and its shoes reflect that. Most gravel shoes use a two-bolt SPD cleat for walkability — you might need to push your bike up a loose climb, cross a stream, or navigate a technical section on foot. The soles are stiffer than hiking shoes but not as rigid as pure road shoes. They also tend to be more durable and weatherproof than their road counterparts.
Best for: Gravel riders, adventure cyclists, mixed-terrain riding, bikepacking.
Casual / City Cycling Shoes
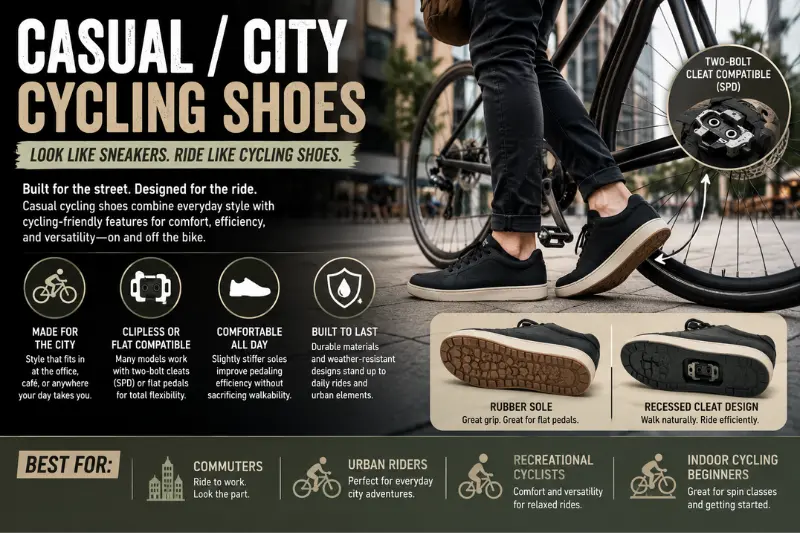
These look like regular sneakers but have features that make cycling more comfortable: a slightly stiffer sole, compatibility with two-bolt clipless pedals, or simply a rubber sole that works well on flat pedals. They’re designed for commuters, casual riders, and anyone who needs to go from bike to office without a shoe change.
Best for: Commuters, urban riders, recreational cyclists, indoor cycling beginners.
Cycling Shoe Soles: The Most Important Feature You’re Not Thinking About
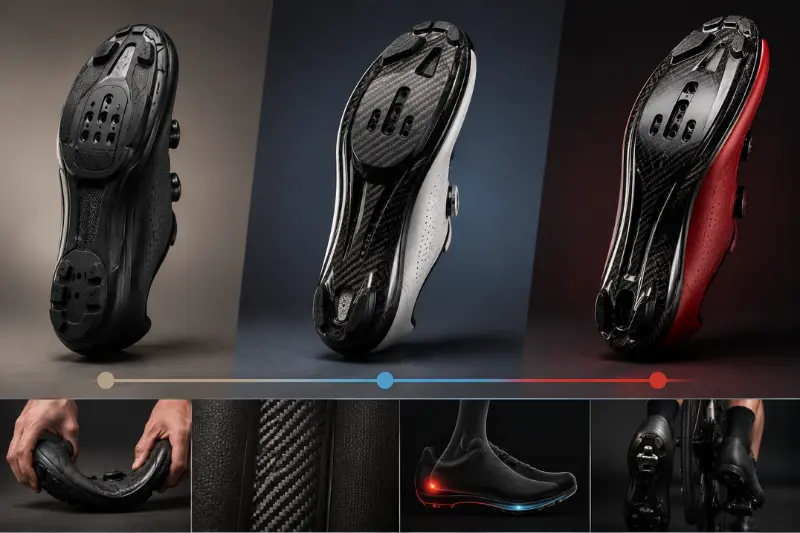
The sole is what separates a cycling shoe from everything else in your closet. Understanding sole materials will save you money and foot pain.
Nylon / Composite Soles
Found on entry-level shoes (typically under $120), these are the most flexible. They’re not bad — they’re appropriate for casual riding, short commutes, and beginner cyclists. But on a hard climb or sprint, a nylon sole will flex, absorbing energy that should go to the pedal. You won’t notice it on a 20-minute ride; you absolutely will on a four-hour one.
Carbon Composite Soles
The middle ground. A blend of carbon fiber and nylon, these soles are significantly stiffer than pure nylon while being lighter and more affordable than full carbon. Most mid-range shoes ($150–$300) use carbon composite, and for the majority of cyclists, they offer an excellent balance of performance and value.
Full Carbon Soles
Found on performance and race shoes ($300+), full carbon soles are the stiffest and lightest option available. They deliver unmatched power transfer. The only nuance is that ultra-stiff soles can cause discomfort on longer, lower-intensity rides — because your foot is held in a completely rigid position, pressure points can develop. This is why bike fitting and insoles matter even more with carbon-soled shoes.
Stiffness Ratings
Some brands (particularly Shimano) publish a stiffness rating for their soles, typically on a scale of 1–12. A rating of 12 means maximum rigidity — ideal for sprinting and intense efforts. For endurance riding, a mid-range stiffness (7–9) often provides a better balance of power and long-ride comfort.
Cleat Systems: Matching Your Shoes to Your Pedals
This is where a lot of beginners make an expensive mistake. Cleats are not universal — you must match your shoe’s cleat holes to a compatible pedal system. Here’s a plain-English breakdown.
Three-Bolt Systems (Road)
- Shimano SPD-SL — The most widely used road system globally. Yellow cleats have 6° of float (sideways movement before release); blue cleats are fixed.
- Look Keo — Popular in Europe, particularly among professional cyclists. Cleats come in three float options (0°, 4.5°, 9°).
- Time XPRO — Less common but favored by some for its unique “X-Track” engagement feel.
Three-bolt cleats protrude from the sole and are not designed for walking.
Two-Bolt Systems (MTB, Gravel, Casual)
- Shimano SPD — The dominant standard. Recessed into the sole, easy to walk in, durable. Used by commuters, tourers, and mountain bikers worldwide.
- Crankbrothers — Used with Eggbeater, Candy, and Mallet pedals. Four-sided engagement means faster clip-in from any angle.
- Time ATAC — Mud-clearing design, popular in cyclocross.
Four-Bolt Systems
Speedplay uses a proprietary four-bolt sole pattern with a unique double-sided pedal design. The cleats are larger and offer a wide range of float customization. Popular with triathletes and cyclists with knee alignment issues.
Key rule: Buy your pedals first, then find shoes with a compatible sole pattern. Or decide on a shoe, then buy matching pedals. Never assume compatibility.
Closure Systems: How Your Shoe Stays on Your Foot
The way a cycling shoe fastens affects fit precision, ease of adjustment while riding, and long-term durability. There are four main systems.
Velcro (Hook-and-Loop) Straps
The most common system on budget shoes. Quick to put on, reasonably secure, and easy to adjust — but the material degrades over time and loses its grip. Two or three straps allow some degree of independent fit adjustment across the foot. Not ideal for precise micro-adjustment on the fly.
Ratchet / Buckle Straps
A step up in precision and security. A ratchet strap clicks to tighten incrementally and holds very firmly. The downside is that loosening usually requires two hands, which isn’t convenient mid-ride. Typically found on mid-range shoes alongside a Velcro strap lower on the foot.
BOA Dial System
The current gold standard for performance cycling shoes. A small rotating dial tensions a thin wire cable across your foot. Key advantages:
- Micro-adjustable on the fly, even with gloves on
- Even pressure distribution across the foot
- Quick-release (pull the dial up) for fast removal
- Very durable — BOA dials carry a lifetime guarantee
Dual-BOA systems (two separate dials for the forefoot and midfoot) allow you to tune different zones of the foot independently, which matters enormously for riders with unusual foot shapes or those who need to adjust fit mid-ride as feet swell.
Laces
Used on a handful of high-end and lifestyle-oriented shoes. Laces distribute pressure very evenly and are genuinely comfortable — but you can’t adjust them while riding, they can come undone, and they can catch in a chainring without a chainguard. Some road racers love them for their aerodynamic profile.
How Cycling Shoes Should Fit: A Practical Guide
Cycling shoe fit is different from regular shoe fit, and getting it wrong is the single most common mistake new cyclists make.
Sizing Down Is Often Correct
Cycling shoes should feel snugger than your street shoes. Your foot needs to be held firmly in place — any lateral movement wastes energy and can cause blisters. Many experienced cyclists size down a half-size, especially in brands that run slightly large (like Specialized). That said, you should never be in pain. Snug is not the same as tight.
Try Them in the Afternoon
Feet swell throughout the day. If you buy shoes in the morning and then do a three-hour afternoon ride, they may suddenly feel too tight. Try shoes (or measure your feet for online ordering) in the afternoon or after a short workout.
The Toe Box Test
Your toes should have a small amount of wiggle room — not much, but enough that they aren’t pressed against the front of the shoe. A cramped toe box is one of the leading causes of numbness and “hot foot” during long rides.
Heel Hold
Your heel should be completely locked down. Zero up-and-down movement. A heel that lifts slightly on each pedal stroke will create blisters, waste energy, and eventually cause knee pain. If your heel lifts and sizing down doesn’t help, try a different shoe model — the heel cup shape varies significantly between brands.
Width: The Variable Most Brands Ignore
Most cycling shoe brands design for a single foot shape — a medium-volume, medium-width foot. If your feet don’t match that template, you’ll suffer.
Signs you may need a wide shoe:
- Numbness or tingling in the forefoot during or after rides
- “Hot spots” or burning sensation under the ball of the foot
- Pain across the top of the foot from straps digging in
- Toes feeling compressed, especially during climbs
Wide-fit options are available from Shimano (most models have a Wide variant), Lake Cycling (which arguably has the most comprehensive wide range in the industry, covering road, MTB, gravel, and winter), and Bont (which offers heat-moldable uppers).
Stack Height: The Spec That Affects How Close You Sit to Your Pedal
Stack height refers to the vertical distance between the bottom of your foot and the center of the pedal axle. A lower stack height (thinner sole) keeps your center of gravity lower and improves aerodynamics and power transfer efficiency. Higher stack heights can feel more comfortable on longer rides.
This is rarely discussed in basic buying guides, but it matters for riders who are dialing in their bike fit. If you switch from a thick-soled MTB shoe to a thin road shoe, your saddle height will effectively increase — and you may need to re-fit your bike.
Insoles: The Upgrade That Changes Everything
Even expensive cycling shoes ship with disappointingly basic insoles — often a thin foam insert that provides minimal arch support. Since your foot is locked in a static, loaded position for hours, a poor insole leads to arch fatigue, forefoot collapse, and pain.
Aftermarket insoles designed for cycling (brands like Superfeet, Solestar, and Specialized BG) offer:
- Proper arch support to prevent the foot from collapsing under pedaling load
- A firm, flat base that improves power transfer compared to cushioned running insoles
- Metatarsal support to reduce forefoot pressure and hot spots
Custom insoles (either heat-molded or fully custom from a podiatrist) go a step further, particularly for riders with flat feet, high arches, overpronation, or bunions.
A note that most articles skip: if you’ve been told you have wide feet but standard insoles haven’t helped, get a basic arch-supporting insole before buying wide shoes. A significant number of riders who think they need wider shoes actually have feet that are collapsing under load — the arch support corrects the spread, and the standard shoe fits.
Triathlon Shoes: A Specific Sub-Category
If you’re racing triathlons, dedicated triathlon shoes are worth knowing about. They differ from road shoes in several key ways:
- Heel loops for rapid mounting while the shoe is already clipped to the pedal
- Easy-open retention systems for fast transitions
- Drainage holes and mesh panels for wet feet
- Single-strap or BOA closure optimized for one-handed tightening
The trade-off: triathlon shoes prioritize speed of entry over thermal protection and long-ride comfort. They’re not ideal for cold weather and can be uncomfortable on rides longer than 90 minutes due to the aggressive fit.
Winter Cycling Shoes and Shoe Covers
Cold and wet conditions demand a different approach.
Dedicated winter cycling shoes have fully enclosed uppers, often with a waterproof and breathable membrane (like Gore-Tex), insulation, and sometimes neoprene. They typically use MTB-style two-bolt cleats for better walkability. The trade-off is that they run warm on the bike — if temperatures rise mid-ride, you’ll notice. Brands like Lake, Fizik, and Shimano all offer winter-specific models.
Neoprene overshoes (booties) slip over your existing cycling shoes and provide insulation and water resistance. They’re more versatile than winter shoes because you can use them with your regular shoes and remove them if conditions change. Downsides: they wear out at the toe and sole quickly, and they don’t provide nearly the same warmth as a proper winter boot below freezing.
Toe covers are the lightest solution — just a neoprene cap for the front of the shoe. Ideal for temperatures between 8°C and 14°C (46–57°F) where full overshoes feel excessive.
Caring for Your Cycling Shoes
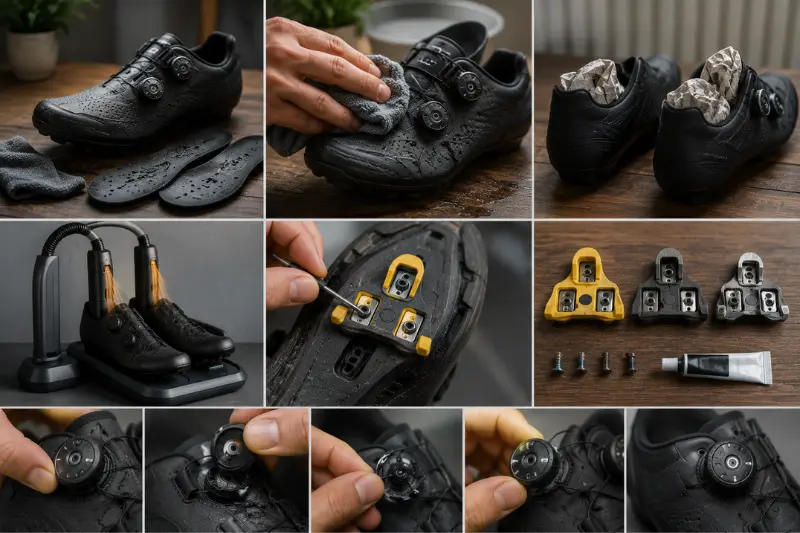
A quality pair of cycling shoes is an investment. Treat them properly and they’ll last years.
After every ride:
- Remove the insoles and let both the shoes and insoles air dry separately. Bacteria and material breakdown thrive in a damp, enclosed shoe.
- Wipe the uppers with a damp cloth to remove road grime, sweat salt, and chain lube.
When shoes get wet through:
- Pack the inside with crumpled newspaper. It draws moisture out efficiently. Replace the paper after a few hours if the shoes are heavily soaked.
- Never dry cycling shoes directly on a radiator or with a heat gun — this can warp carbon soles and degrade adhesives.
- A dedicated shoe dryer (with gentle warm airflow) is the best tool for regular wet-weather riders.
Cleat maintenance:
- Check cleats regularly for wear. On the SPD-SL system, Shimano colors their cleats — when the grooves wear down significantly, the release force changes and you risk either being stuck in or accidentally releasing under load. Replace cleats every 3,000–5,000 km depending on usage.
- Keep cleat mounting bolts torqued to spec and apply a small amount of anti-seize compound to prevent bolt seizure (especially on carbon shoe soles where aluminum bolts can bond over time).
BOA dial care:
- If a BOA dial becomes stiff or erratic, BOA offers free replacements for life. Simply contact them or the shoe brand directly.
Common Questions Answered
Do I need different shoes for indoor training?
Not necessarily — but indoor trainers are hard on shoes. The combination of heat, sweat, and static loading (no coasting, constant pedaling) accelerates material wear and degrades insoles faster. Many dedicated indoor cyclists keep a separate pair for the turbo trainer. If you’re buying one pair, use them indoors; just dry them carefully after each session.
My feet go numb on long rides. What’s causing it?
Numbness (often called “hot foot”) has several possible causes:
- Shoes too tight — especially if you tighten them at the start of a ride before your feet have swollen
- Shoes too narrow — compressing metatarsal heads and cutting off circulation
- Cleat position too far forward — moving the cleat back (towards the heel) reduces forefoot pressure dramatically
- Ultra-stiff soles on low-intensity rides — the constant rigid contact point concentrates pressure; a slightly less stiff sole or a metatarsal button insole can help
- Saddle too high — causing excessive ankle extension that strains the forefoot
Try loosening your shoes slightly mid-ride. If the numbness eases, fit or width is the issue. If it doesn’t, cleat position is more likely the culprit.
How often should I replace cycling shoes?
Most quality cycling shoes last 3–5 years with regular use, assuming you care for them properly. Signs it’s time to replace:
- The heel cup has softened and no longer holds your foot firmly
- The sole has delaminated from the upper
- The BOA or ratchet mechanism fails and can’t be replaced
- Persistent hot spots or pain that a new insole doesn’t resolve (the last has deformed)
Can I use road shoes for spin class?
Yes, if the studio uses SPD-SL-compatible pedals (common in higher-end studios). Many spin studios use SPD-compatible pedals (two-bolt), in which case road shoes with three-bolt soles won’t work unless you use an adapter cleat. Check what pedal system your studio uses before buying.
Quick Reference: Choosing by Riding Type
| Rider Type | Recommended Sole | Cleat System | Closure |
|---|---|---|---|
| Road racer | Full carbon | 3-bolt (SPD-SL/Look) | Dual BOA |
| Gran fondo / sportive | Carbon composite | 3-bolt | Single BOA or ratchet |
| Commuter | Nylon / composite | 2-bolt (SPD) | Velcro / ratchet |
| MTB / trail | Carbon composite | 2-bolt (SPD) | BOA or ratchet |
| Gravel / adventure | Carbon composite | 2-bolt (SPD) | BOA or ratchet |
| Triathlete | Carbon | 3-bolt | Single BOA |
| Casual / urban | Nylon | 2-bolt or flat | Velcro / laces |
| Wide feet | Any (check width specs) | Match to pedals | BOA preferred |
Final Thoughts: Don’t Compromise on Fit
The best cycling shoe is the one that fits your foot correctly, suits your riding style, and pairs with your pedal system. A $150 shoe that fits perfectly will outperform a $500 shoe that pinches your toes or lets your heel float.
Before spending more on a lighter wheelset or a stiffer frame, make sure your shoes are genuinely working for you. Get a professional bike fit if you can, or at minimum spend time dialing in your cleat position — it’s free and the performance gain is real.
Your feet will thank you on mile 60 when everyone else is reaching down to loosen their straps.