
If you only need the short version, here’s exactly what chrome nails require for a salon-quality mirror finish:
- Apply a fully cured, non-wipe gel top coat — black or white base colors show the metallic effect best.
- Pick up a small amount of chrome powder on a silicone tool, sponge, or soft brush.
- Press and rub the powder onto the nail in circular motions until it turns mirror-like, not gritty.
- Dust off excess powder with a clean, dry brush before sealing.
- Seal everything with a second top coat, capping the free edge so the chrome can’t lift or chip.
That’s the entire process in five steps. Chrome nails are not a polish — they’re a fine metallic pigment that gets rubbed onto a tacky-free, fully cured top coat, where it bonds to create a reflective, mirror-like surface. Most problems people run into (patchiness, chipping, dull spots) trace back to one of three things: an undercured top coat, too much powder applied at once, or skipping the final seal coat. The rest of this guide walks through why that happens, the full step-by-step method, and the variations worth knowing depending on whether you’re doing this at home or in a professional gel system.
Why Chrome Nails Go Wrong (The Real Cause)
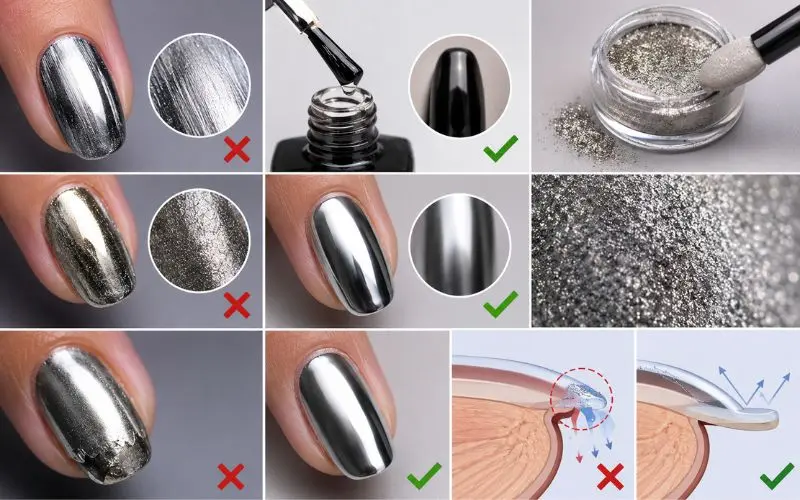
Chrome nail powder isn’t a paint — it’s an extremely fine metallic pigment, often referred to as mirror powder, that physically adheres to a sticky top coat layer rather than blending into it like a polish would. Understanding this one fact explains almost every common chrome nail problem.
- Patchy or streaky chrome usually happens because the top coat wasn’t tacky enough when the powder went on, or too much powder was applied in one spot instead of being worked in evenly with circular motions.
- Chipping and peeling almost always comes down to two things: the top coat was over-cured (so the powder has nothing to grip), or the final seal coat wasn’t applied thickly enough, or didn’t fully cap the free edge, leaving an exposed entry point for moisture and friction.
- Dull, gritty-looking chrome instead of a true mirror finish is usually a sign of low-quality pigment with too large a particle size, or too much product applied so it sits on top of the nail like glitter rather than bonding into a smooth metallic layer.
Once you understand that chrome nails are really a two-part chemistry problem — surface tackiness plus pigment quality — every step below makes a lot more sense.
Step-by-Step: How to Do Chrome Nails

Step 1: Prep the Nail Properly
Good chrome nails start before any color goes on.
- Push back cuticles gently and shape the nail with a 220–240 grit file.
- Lightly buff the nail plate so the surface isn’t shiny or smooth — gel adheres poorly to a slick nail.
- Wipe the nail with a lint-free pad and a small amount of acetone to remove oils and dust.
Skipping this step is one of the most common reasons a chrome manicure lifts within days, regardless of how well the chrome itself is applied.
Step 2: Apply Base Coat and Gel Color
- Apply a thin layer of base coat and cure it fully.
- Apply your chosen gel color — black and white are the most popular choices because they make the metallic chrome effect pop, but any color works underneath.
- Cure for the manufacturer’s recommended time. Two thin coats almost always look better than one thick one.
Step 3: Apply a Non-Wipe Top Coat
This is the step that makes or breaks the entire chrome nail process.
- Apply a non-wipe top coat over the cured color and cure it fully under the lamp.
- Do not over-cure. A fully cured top coat should feel slightly tacky, not hard and glassy — if it’s too hard, the chrome pigment has no surface to grip onto.
- Follow the exact cure time on the product label; guessing here is the single most common mistake people make with chrome nails.
Step 4: Apply the Chrome Powder
- Use a silicone applicator, a disposable eyeshadow-style brush, or a soft makeup sponge — never your finger, since skin oils contaminate the pigment and can cause skin irritation.
- Pick up a small amount of powder and press it onto the nail, working it in with gentle circular motions rather than swiping it on like glitter.
- Continue rubbing with the clean side of your applicator once you see the shine appear — this final buffing step is what creates the true mirror look rather than a sparkly, uneven finish.
- Use a soft fluffy brush to dust off any loose excess powder before moving to the next step.
Step 5: Seal With a Final Top Coat
- Apply a second top coat over the chrome, making sure to cap the free edge completely.
- Cure fully under the lamp.
- This sealing step is non-negotiable — chrome nails without a proper final seal will chip or peel within days, no matter how well the powder itself was applied.
Alternative Ways to Get Chrome Nails (For Different Needs and Skill Levels)
Chrome nails aren’t one-size-fits-all. Here’s how the approach changes depending on your situation.
At-home with regular polish (no gel system):
Chrome powder can technically be used over a fully dried regular polish with a non-wipe top coat substitute, but results are far less durable and less mirror-like than with a gel system, since regular polish doesn’t create the same tacky bonding surface. If you’re new to chrome nails, this route is best treated as a short-term, special-occasion look rather than a long-lasting manicure.
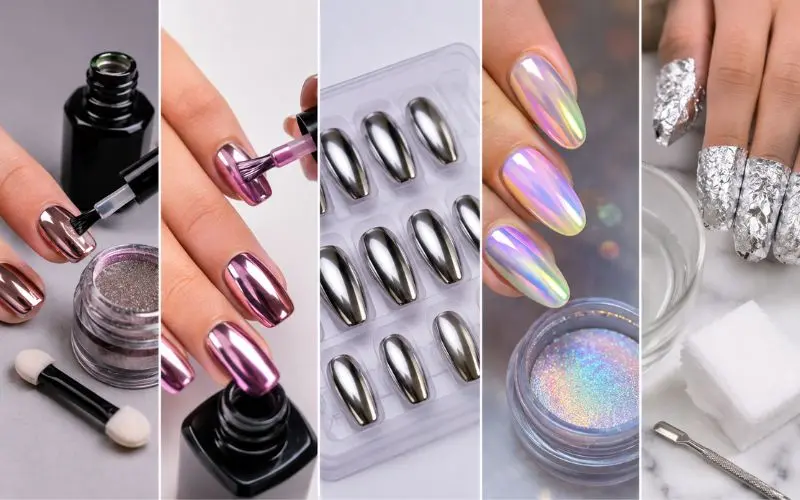
Chrome gel polish (pre-mixed):
Some brands sell chrome pigment pre-mixed into a gel polish formula. This skips the powder-application step entirely and is more beginner-friendly, though the mirror effect is usually less intense than powder applied by hand.
Press-on chrome nails:
For anyone who wants the look without any application process at all, pre-made chrome press-ons are a low-effort, temporary alternative — useful for events or for testing whether you like the style before committing to a gel chrome manicure.
Color-shifting and aurora chrome:
Beyond classic silver “mirror chrome,” aurora chrome and color-shifting chrome powders create a shifting, opal-like effect depending on the light and viewing angle. These use the same application technique as standard chrome but are more forgiving of small imperfections since the color-shift effect hides minor unevenness.
Removing chrome nails safely:
Soak nails in 100% acetone for 10–15 minutes with cotton wrapped in foil, rather than peeling or filing the chrome off, which can damage the natural nail plate underneath. Gently push off the softened product with a cuticle stick instead of scraping.
How Long Do Chrome Nails Last?
With a proper gel system, sealed correctly, a chrome manicure typically lasts as long as a standard gel manicure — around two to three weeks — before regrowth or normal wear becomes noticeable. The chrome effect itself doesn’t fade faster than the gel underneath it; it fails when the seal coat was incomplete, which is why Step 5 above matters as much as the chrome application itself.
10 Frequently Asked Questions About Chrome Nails
1. Can I do chrome nails without a UV lamp?
Not effectively. Chrome powder needs a tacky, cured gel top coat to bond to, and gel only cures properly under a UV or LED lamp.
2. Why is my chrome nail powder not sticking?
The top coat is likely over-cured and too hard, or it was wiped clean of its natural tackiness before the powder was applied.
3. What color base works best under chrome?
Black and white are the most popular because they create the strongest contrast with the metallic shine, but any color works.
4. Can chrome nails be done over acrylic or builder gel?
Yes — the same non-wipe top coat and powder method works over acrylic, builder gel, or regular gel polish.
5. Why does my chrome nail look dull instead of mirror-like?
This usually means too much powder was applied, or the pigment quality is low with a larger particle size than true mirror chrome.
6. Is chrome nail powder safe to use?
Yes, when cosmetic-grade powder is used with proper ventilation, gloves, and avoiding direct skin or eye contact during application.
7. How do I stop chrome nails from chipping?
Make sure the top coat isn’t over-cured before applying powder, and always seal with a final top coat that fully caps the free edge.
8. Can I apply chrome nail powder with my finger?
It’s not recommended — finger oils contaminate the pigment and can reduce the mirror effect, plus repeated skin contact can cause irritation.
9. Do chrome nails work on short nails?
Yes, the technique is identical regardless of nail length; chrome often looks especially clean and modern on shorter, squared nails.
10. How do I remove chrome nails without damaging my natural nails?
Soak in 100% acetone for 10–15 minutes using foil-wrapped cotton, then gently push off the softened product rather than peeling or filing it away.
Final Thoughts
Chrome nails look complicated because the finished result is so dramatic, but the actual technique comes down to getting one thing right: a properly cured, tacky top coat for the pigment to bond to. Once that foundation is solid, the rest of the process — picking up powder, buffing it into a mirror finish, and sealing it — is straightforward enough for both salon professionals and confident at-home manicurists to get consistent, long-lasting results.
Whether you’re using classic mirror chrome, color-shifting aurora powder, or a pre-mixed chrome gel polish, the same core principle applies every time: surface prep and proper sealing matter just as much as the chrome itself.